Understanding Objects in JavaScript

Welcome, future JavaScript developer! If you've just learned about arrays and are starting to build more complex logic, you've probably thought, "Storing everything in a list is great, but how do I represent a real person or a student?" That's where Objects come in.
Think of objects as the filing cabinets of JavaScript. They help you organize data in a way that makes sense to humans.
What are Objects and Why Do We Need Them?
In JavaScript, an object is a standalone entity, with properties and a "type". But in simpler terms, an object is a collection of key: value pairs.
Imagine you want to store information about a person. Using individual variables, it would look like this:
const personName = "Alice";
const personAge = 25;
const personCity = "New York";
This is messy and doesn't group Alice's data together. What if you had 10 people?
An object solves this by grouping related data into a single, organized structure:
const person = {
  name: "Alice",
  age: 25,
  city: "New York"
};
Now, all of Alice's information lives in one variable: person. This is the core of why we need objects: organization and context.
Objects are Key-Value Pairs
Every piece of data in an object has a key (also called a property name) and a value.
Key: The name you use to access the data (e.g.,
name,age).Value: The actual data (e.g.,
"Alice",25). This can be any data type: a string, number, boolean, array, or even another object!
Creating Objects
There are a few ways to create an object, but the most common and simplest is using object literal syntax—just using curly braces {}.
// An empty object
const emptyObject = {};

// Creating our student object
const student = {
  name: "Bob",
  age: 20,
  course: "Computer Science"
};

console.log(student);
Accessing Object Properties
Once you have an object, you need to get the data out. JavaScript gives you two ways to do this.
1. Dot Notation (.)
This is the most common and readable way. You simply use a dot followed by the key name.
const student = {
  name: "Bob",
  age: 20,
  course: "Computer Science"
};

console.log(student.name); // Output: Bob
console.log(student.course); // Output: Computer Science
2. Bracket Notation ([])
This method uses square brackets and the key name as a string. It looks like accessing an array element.
console.log(student["name"]); // Output: Bob
console.log(student["age"]);  // Output: 20
When to use which?
Use dot notation most of the time. It's cleaner.
Use bracket notation when the property key is stored in a variable, or if the key has special characters (like a space) that dot notation can't handle.
let propertyToGet = "course";
console.log(student[propertyToGet]); // Output: Computer Science

const weirdObject = {
  "favorite color": "blue"
};
console.log(weirdObject["favorite color"]); // Bracket notation is required here
Updating Object Properties
Updating a property is as simple as accessing it and assigning a new value.
const student = {
  name: "Bob",
  age: 20,
  course: "Computer Science"
};

// Bob had a birthday!
student.age = 21;

// He decided to change his major
student["course"] = "Mathematics";

console.log(student);
// Output: { name: 'Bob', age: 21, course: 'Mathematics' }
Adding New Properties
Adding a property is exactly the same as updating one. If the key doesn't exist, JavaScript will create it for you.
const student = {
  name: "Bob",
  age: 20
};

// Adding a new 'course' property
student.course = "Physics";

// Adding a new 'city' property using bracket notation
student["city"] = "Boston";

console.log(student);
// Output: { name: 'Bob', age: 20, course: 'Physics', city: 'Boston' }
Deleting Properties
To remove a property from an object, you use the delete operator.
const student = {
  name: "Bob",
  age: 20,
  course: "Physics",
  temporaryData: "delete me"
};

delete student.temporaryData;
delete student["course"]; // You can also use bracket notation

console.log(student);
// Output: { name: 'Bob', age: 20 }
// The 'course' and 'temporaryData' properties are gone.
Looping Through Object Keys
One of the most powerful things you can do with an object is loop through all its properties. The best way to do this is with a for...in loop.
const student = {
  name: "Charlie",
  age: 22,
  course: "Web Development"
};

for (let key in student) {
  console.log(key); // Logs the property names: name, age, course
}
To get both the key and the value, combine the for...in loop with bracket notation:
const student = {
  name: "Charlie",
  age: 22,
  course: "Web Development"
};

for (let key in student) {
  console.log(`The key is: \({key} and the value is: \){student[key]}`);
}

// Output:
// The key is: name and the value is: Charlie
// The key is: age and the value is: 22
// The key is: course and the value is: Web Development
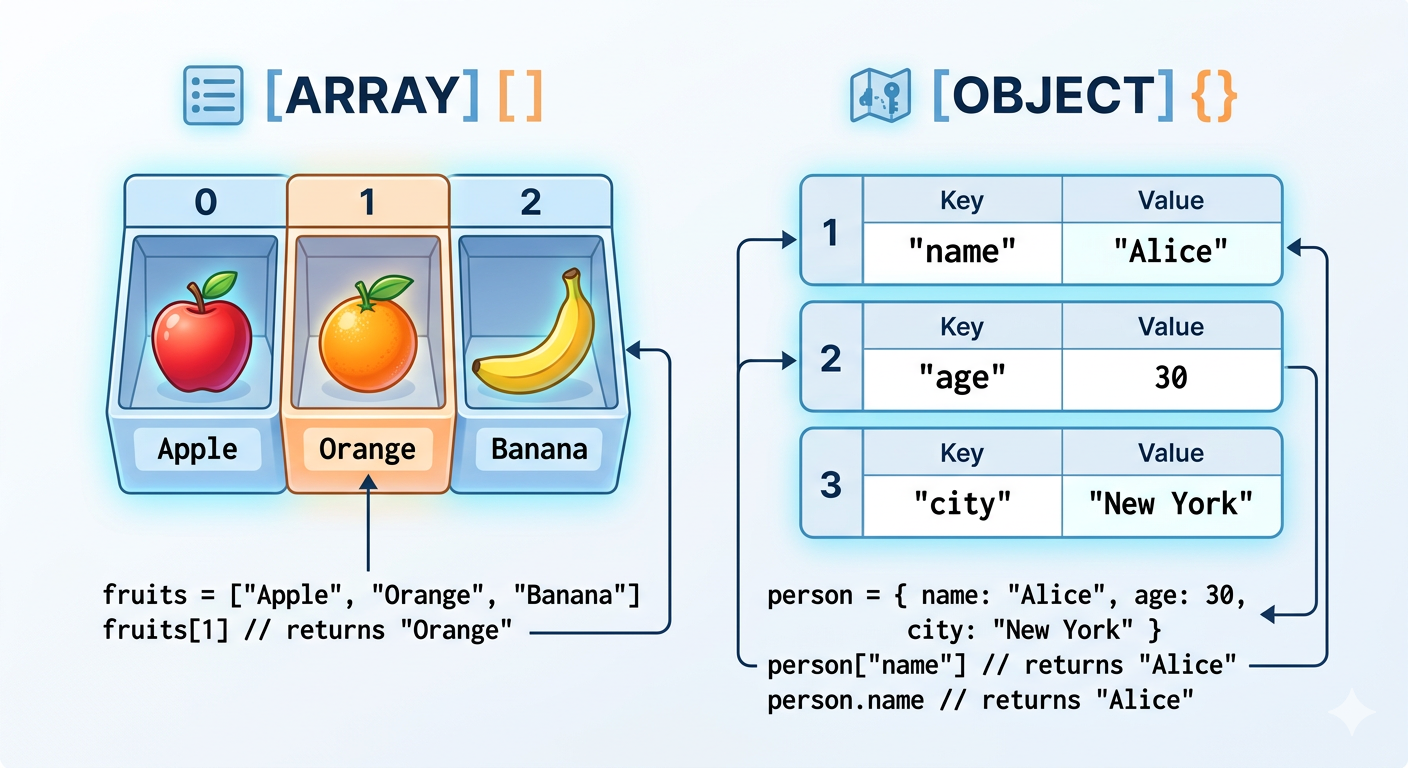
Objects vs. Arrays - When to Use Which?
| Feature | Array | Object |
|---|---|---|
| Purpose | Stores ordered list of values | Stores key–value pairs |
| Data Types Stored | Any (homogeneous is common) | Any (often heterogeneous data) |
| Access | Access using index numbers | Access using keys (property names) |
| Order | Maintains numeric order (0,1,2...) | Order is not the main concept |
| Use Case | Best for lists of similar items | Best for structured data |
| Syntax | [] |
{} |
Assignment: Your Turn!
Let's solidify this with the assignment idea. Try this on your own machine or in your browser's console.
Create an object representing a student. Add properties for
name,age, andcourse.Update one property. For example, increase the student's age by one.
Print all keys and values using a
for...inloop just like the example above.
Solution (Try it yourself first!):
// 1. Create the object
let myStudent = {
    name: "Priya Patel",
    age: 20,
    course: "Data Science"
};

// 2. Update a property
myStudent.age = 21;

// 3. Loop through and print
console.log("Updated Student Record:");
for (let key in myStudent) {
    console.log(`\({key}: \){myStudent[key]}`);
}
Conclusion
Objects are the backbone of JavaScript. They allow us to write code that mirrors the real world, making our programs more intuitive and organized. By mastering the basics of creating, accessing, updating, and looping through objects, you've taken a massive step forward in your JavaScript journey.
Now that you know how to structure data with objects, you're ready to tackle more advanced concepts.
Happy coding! 💻


